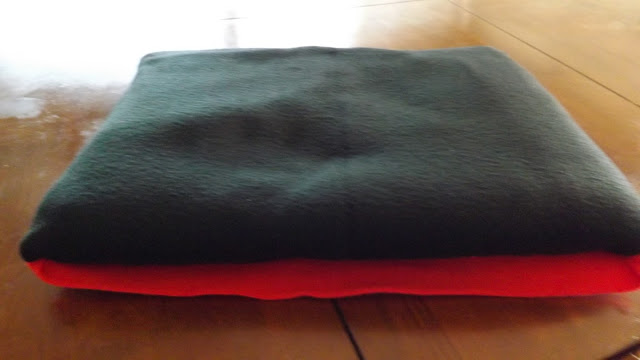
So yesterday marked another 9 days down in our Disneyland countdown, which means we are doing another craft project to get everyone hyped up. I asked the kids of the things that were left what they would like to do, and they all unanimously agreed that they wanted to make Quillows.
"What is a quillow?" you may ask. Well that's easy, quilt + pillow = quillow. It's a blanket that can be folded up into itself to make a pillow.
To start I got purchased some fleece because you don't have to worry about frayed edges and it's nice and warm, so it makes a perfect product for this. I got 2 yards of 54" material for each blanket, 4 blankets = 8 yards of fabric, plus a 1/2 a yard of a complimentary color, no need to get extra here 54" is enough for the pockets.
Our blanket color is black, and our pocket color is red to go with the Disney/Mickey Mouse theme.
First cut the red material into 1/4 to make a pillow size rectangle. (the kids helped with all the cutting and the pinning, I did all the sewing.)
Then I found the center fold of the black fleece along the bottom and marked it. I found the center bottom of the red and laid it on top of the center of the black.
Next I pinned the materials together.
Finally I sewed along the sides and bottom of the pocket.
All done!
Now the only question I have is: Should we use the Mickey Mouse head, or should we do his trouser buttons to accessorize?
Saturday, September 22, 2012
Wednesday, September 12, 2012
And the Countdown Begins
That's right ladies and gentlemen, the countdown until Disneyland has officially begun. There is only 72 more days! Okay, okay, I know, 72 days is a long ways away, but I wanted to build the anticipation up for this trip. It's our first time going to The Happiest Place On Earth, and for all I know, it could be our last, so I'm all in, on this one! To help build the anticipation, we are doing a craft project every 9ish days, and today was our first craft. The kids and I put together lanyards to keep our tickets and fast passes, and emergency information in. Here's what it looks like:
1. You will need to measure the length that you would like your lanyard to be. We used about 30" per lanyard. Be sure to finish the edges by burning them or using an anti-fraying product.
3. Slide the D-ring on and then determine
how you want your lanyard to lay. For us it ended up that there was a
1/2 twist in the making of it, so that it would be flat when it was
complete.
You're pretty much finished now.
Don't forget to check back soon for more crafting fun as we get ready for our vacation!
My oldest sporting her lanyard |
So you Say that you may want to try your hand at making one of these. Here is what you need to do the job:
Some 1" Strapping, a "D" ring, a clip for 1" strapping, a lanyard pouch, a clip, and for decoration I made these cute Disney pins. |
2. Next thread your strapping through one end of your clip and sew it in place. |
4. Now that you know how you want it, thread and sew the other end on. |
5. Both ends should now be sewn on. Clip them together and take the D-ring that is just sliding around and find the center of your lanyard. |
6. Sew the D-ring in place so it stays put. |
7. Just add the lanyard clip to the D-ring, and the pouch to the end of that clip, and you are all done! |
If you chose to embellish with anything, this is the time that you would do so. For us, I just pinned the button on, and we were set. |
Sunday, September 9, 2012
House full of Monkeys
Well, this last week my youngest child started preschool. We weren't thinking that she would make it into the school, she was on the wait-list, and we were told that our chances were slim. Then, I got a phone call that there was an opening for her, and she started the next day!! I don't know if I'm happy about that or really sad about it, she is my last, so I yearn to keep her my baby forever, but alas, they grow up and I must accept it.
Anyway 3 of my kids are now at parent participation schools, which means that 4 hours each week I am in each of their classes, and even though I'm not required to be in my eldest child's school each week, I am there as well. So that means that I have 3 schools, and 4 days of volunteer work each week, it's been a whirlwind to say the least, and has left me with little time to do anything outside of kids.
Today however, I was able to do some crafting fun. I took one of my husband's old t-shirts, and I cut it up into a vest for my teenager, and a pillow for my rocking chair. I also was able to make some homemade....well semi-homemade...monkey-bread. I wasn't able to take pics of the vest because my daughter grabbed it up so fast that I couldn't. The pillow, well it's a pillow, it's burgundy, it's soft and fluffy. But the monkey-bread, now that's what this is all about.
Sooooo Good, and so easy. Here it is:
Preheat your oven to 350 and grease or spray a bunt cake pan.
While oven is preheating, prepare your mix by putting the sugar and cinnamon into your zip top bag. Open your biscuits and cut each into quarters and place into the sugar and cinnamon mixture, only do one tube at a time or you won't get a good coat on all your pieces. Take out the coated pieces and put them into your greased bunt pan, and repeat the same steps for the next three tubes of biscuits. Melt the butter and add the brown sugar to it, then pour the mixture over the pieces in the bunt pan. Put the whole thing into the oven for 40 minutes. Remove promptly from oven and cool for 10 minutes before removing it onto a serving plate/tray. Cool for another 5 minutes, then serve warm.
MMMMMMM
And tonight I swapped out the sugar for truvia so that at least there was a little bit less guilt for eating it. Still turned out amazing.
Isn't she a cutie!?! |
Today however, I was able to do some crafting fun. I took one of my husband's old t-shirts, and I cut it up into a vest for my teenager, and a pillow for my rocking chair. I also was able to make some homemade....well semi-homemade...monkey-bread. I wasn't able to take pics of the vest because my daughter grabbed it up so fast that I couldn't. The pillow, well it's a pillow, it's burgundy, it's soft and fluffy. But the monkey-bread, now that's what this is all about.
Sooooo Good, and so easy. Here it is:
- 4 tubes of Pillsbury (or store brand works too) biscuits, but not the grands, they are too big, just the regular size ones
- 1/2 cup of butter or margerine
- 3/4 cup of sugar
- 3/4 cup packed brown sugar
- 2 teaspoons cinnamon
- gallon zip top bag
Preheat your oven to 350 and grease or spray a bunt cake pan.
While oven is preheating, prepare your mix by putting the sugar and cinnamon into your zip top bag. Open your biscuits and cut each into quarters and place into the sugar and cinnamon mixture, only do one tube at a time or you won't get a good coat on all your pieces. Take out the coated pieces and put them into your greased bunt pan, and repeat the same steps for the next three tubes of biscuits. Melt the butter and add the brown sugar to it, then pour the mixture over the pieces in the bunt pan. Put the whole thing into the oven for 40 minutes. Remove promptly from oven and cool for 10 minutes before removing it onto a serving plate/tray. Cool for another 5 minutes, then serve warm.
MMMMMMM
And tonight I swapped out the sugar for truvia so that at least there was a little bit less guilt for eating it. Still turned out amazing.
Subscribe to:
Posts (Atom)